How To Setup A Domain Name In GoDaddy In 8 Easy Steps

How To Setup A Domain Name In GoDaddy
If you’ve decided to join the ranks as a blogger then there is a whole lot of techy stuff you have to do to even get to your first blog post.
One of the first things you must do is register & buy your blog’s domain name.
Now I could go into how to choose a domain name but that’s a different subject altogether.
If you want help learning how to choose a domain or blog name let me know in the comments.
This post is strictly about how to buy a domain name specifically with GoDaddy, which is who I use for my domains. I’ll take you step by step through the process.
Plus I’ll tell you later about a free checklist I made that gives you step by step instructions on how to do some of the other techy stuff that can be so frustrating as new bloggers!
How To Register Your Blog’s Domain Name In GoDaddy In 8 Easy Steps
Oh yeah, and this post contains affiliate links to great products that will help you in your blogging journey. I will get a commission if you decide to buy from these links but I’m only recommending products that I feel confident about.

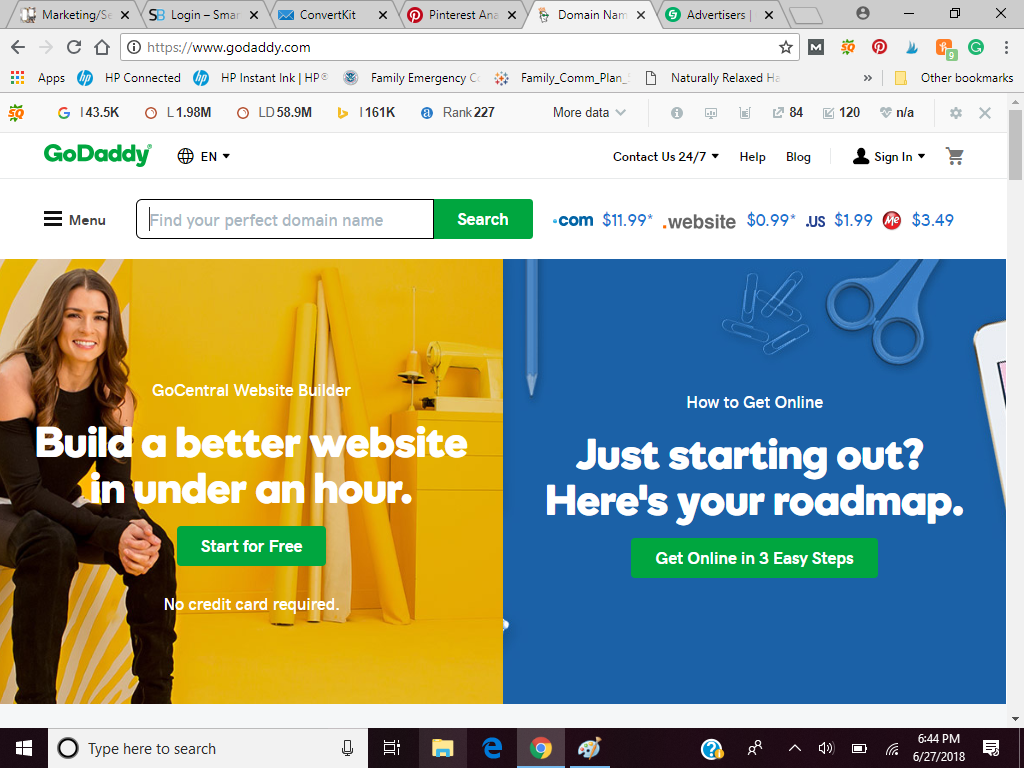
1) First, go to GoDaddy.com
I’m totally biased when it comes to where you should buy your domain name from.
It’s just that I’ve used other providers in the past and I always come back here.
Their interface is simple and easy to use and I’ve never had any problems with them.
So that’s who I always recommend.
Click Here To Learn More About GoDaddy’s Domains
2) At the top of the GoDaddy page, there’s a field that says find your perfect domain name.
This is where you can go ahead and put the name that you’ve chosen for your blog and see if it’s available and hit enter.
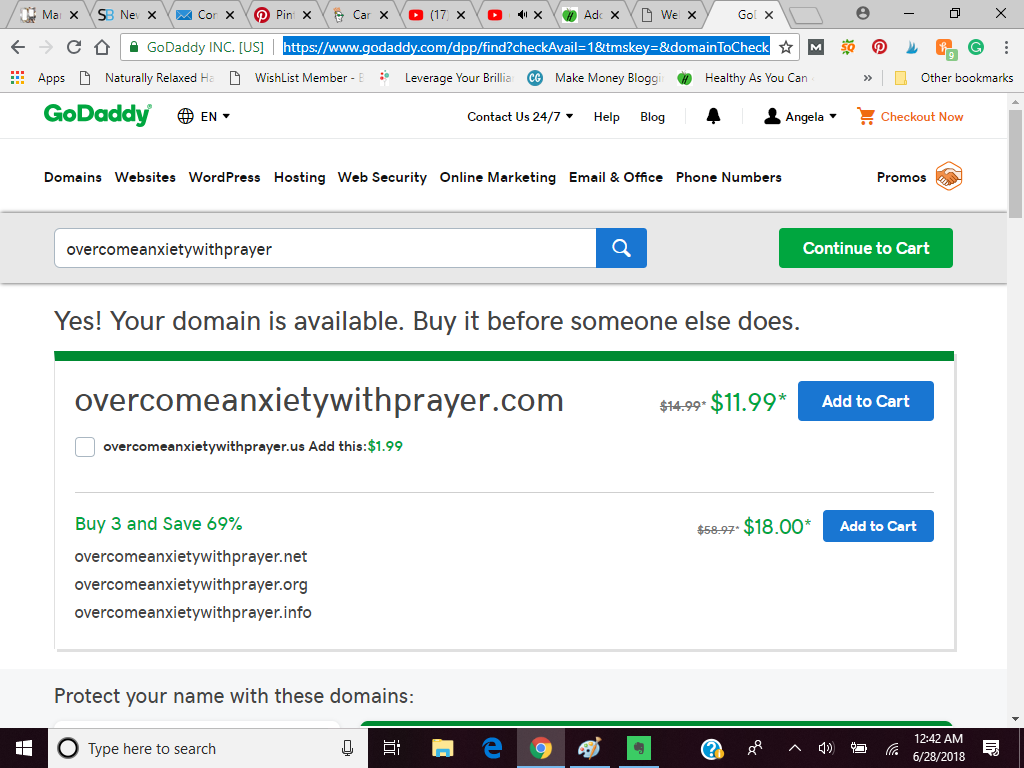
I’m going to go with the same name that I made up in this blog post about doing keywords, overcomeanxietywithprayer.com and see if it’s available.

Well, would you look at that? That domain name is available.
Cool beans.
Now here is where I would tell you to buy the .com.
Whenever the .com is available then that’s what I think you should buy, every time.
It may not really matter but I believe overall it looks more professional than a .us or .info.
However, you should buy whatever domain name you can afford because most of the time people don’t type in your URL.
People usually come to your site through a link.
3) Add the domain of your choice to your cart.
Then go to your cart. The cart should be in the upper right-hand corner of the page.
It’ll ask you if you want to create an email address. I would suggest you choose no.
When you buy your web hosting you can create all of the domain-based email addresses you could ever need, at no extra cost.
Choose no and click continue with these options.
4) Now they are going to ask you to login or create a new account.
I already have an account so I will log in. If you don’t have an account then just create one, entering in your personal information.

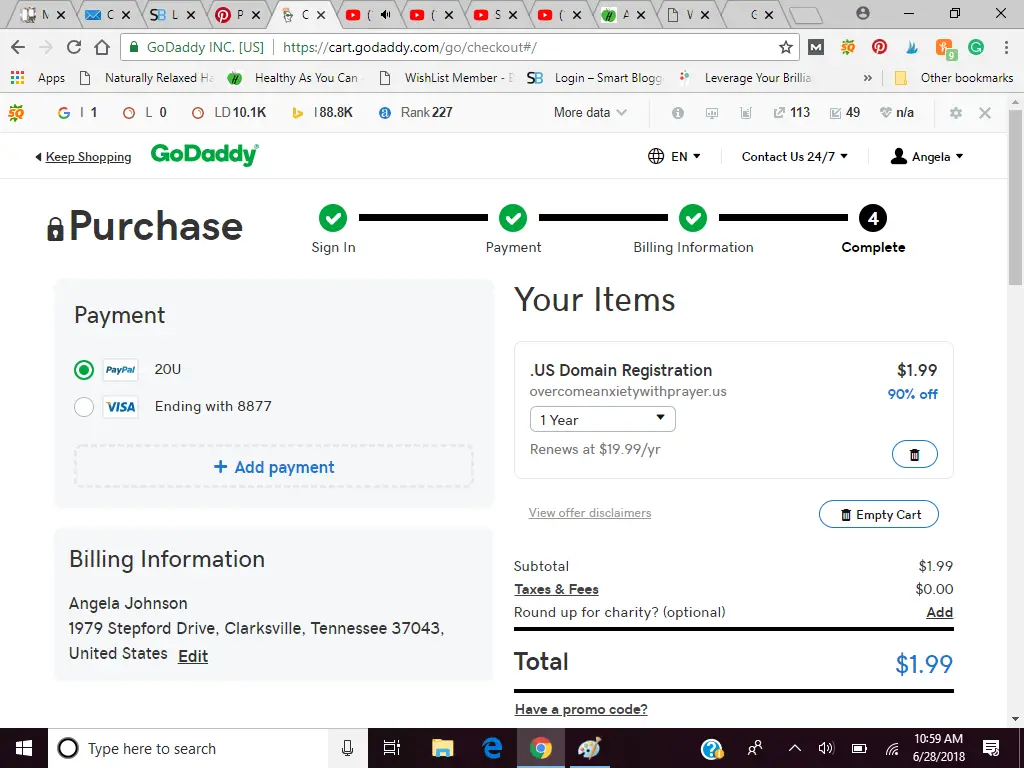
5) After you register you will go to a screen that says purchase.
Now here is where you need to pay attention.
Check and make sure that you are only buying your domain for the number of years you actually want to buy for.
In other words, if you only want to buy the domain for one year, make sure you are only paying for one year.
Sometimes Godaddy will add 5 years to your cart without you asking them to.
You can very easily change that but you need to be paying attention.
Just go where it says domain register and the drop-down menu underneath tells you how many years you can purchase.
Choose the one of your liking.
6) You also have the option to add search engine visibility and matching domains.
You don’t have to do this. It’s up to you.
I don’t know how helpful the search engine visibility is but if it’s a good price it can’t hurt to try it.
8) Now check your email for your GoDaddy emails they will send you.
I would suggest putting these emails in a folder because you will refer back to them often and you want them to be easy to find.
And there you have it. Easy peasy!
Want To Avoid The Tech Headache? Here’s A Free Download To Help
Having to navigate all of these tech issues as new bloggers can make you feel like giving up.
But I know you’re going to do that.
That's why I created this simple little checklist that is a step by step tutorial on how to do the following:
- Buying domain name
- Buying your web host service.
- Pointing domain name to your web host.
- Installing WordPress on your web host.
Just enter your email address below and I’ll send you the checklist to your inbox.
You will also become a part of the Christian Blogging Academy community where I send newsletters and additional freebies.
But don’t worry. you can opt-out at any time!
Conclusion Of How To Register & Buy A Domain Name For Your Blog Using GoDaddy In 8 Easy Steps
This is by far the easiest part of setting up your blog.
I hope I explained it well and that you feel ready to go ahead and get started on your blog today.
If you have additional questions about setting up a domain name please let me know in the comments and I will try and answer them if I can.
My next post will be about purchasing your web hosting services, so stay tuned.


Ready To Answer Your Calling & Start A Blog But Confused On Where To Start?
Learn How To Start A Blog For Under $150! Just Click Here
You Can Do This!
Check out these other Christian Blogging Academy posts on How To Start A Blog
3 Subtle Signs God Is Calling You To Be A Blogger (That You Shouldn’t Ignore)
How To Stop Procrastinating & Start Your Christian Blogging Journey (Even If It Scares You) Part 1
How To Stop Procrastinating & Start Your Christian Blogging Journey (Even If It Scares You) Part 2
3 Powerful Steps To Finding The Perfect Christian Blog Niche
How To Buy A Domain Name In 8 Easy Steps
5 Brilliant Ideas For Choosing A Christian Blog Name (With Picture Examples)
How To Purchase Your Web Hosting Service In 3 Simple Steps
The 4 Types Of Blog Content That Will Help Your Christian Blog Grow Dramatically
How To Make The Most Profitable Blog Niches Work As A Christian Blogger
How To Make Money From Your Christian Blog On Day One
7 Mistakes Blogging Beginners Make (That Pro Bloggers Don’t) & How To Fix It

